
Disclaimer, before you read any further: most of the footage and imagery in this particular post were shot entirely on my iPhone. As the name states, this was my midnight bake/snack. Screw professionalism, we’re snacking. Albeit, snacks shouldn’t take almost two hours to make, but this is a midnight snack, rules of time don’t apply. Moreover, I’m still in quarantine with not much purpose in life.
I’m going to try and keep this short and sweet; it’s a no-fuss, no-knead recipe. Anyone can make it: five essential ingredients, two hours, one delicious batch of focaccia bread. Let’s get this focaccia!
Now, I love focaccia; it’s great. It smells great, it's soft, it's crunchy. It’s a bread that doesn’t ask for anything else; you just have to enjoy it on its own. It’s the best example (in a good way) of what happens when you have free reign over things. As mentioned above, you only need five essential ingredients, and the toppings are entirely up to you. Load it with all sorts of herbs and vegetables, or make one of those envious yet beautiful focaccia gardens all over Instagram or just leave it bare! Don’t forget to add salt, though; you don’t want bland focaccia.

Plus, it makes for a great midnight snack as well as breakfast/brunch food when you wake up at noon the next day and probably start regretting the way your sleep schedule is these days. But, there’s a huge advantage, this recipe is easy as pie and focaccia bread smells damn good while it’s in the oven. I cannot put it into words, you just have to try it our yourself!
Anyway, I said this post would be short, and so it will be.
And, just because it’s a short post, being shot mostly on a mobile phone, and done at midnight doesn’t mean that I won’t (briefly) explain everything about focaccia to you. This recipe is still legit, and can totally be made at a reasonable time of the day. Plus, it’s a no-knead recipe, and it doesn’t call for overnight proofing of the dough or anything. Remember, you’ll need to devote only two hours, most of which is just waiting time. So, feel free to multitask.
There will be three parts, as usual, in this post about focaccia;
What’s focaccia?
What equipment do you need?
What’s the recipe?
What’s focaccia?
Focaccia is an Italian flatbread. The dough, you’ll find, has a texture that’s very similar to pizza dough. Focaccia can be eaten on its own and can also be used to make a sandwich. It's fluffy, and pillowy on the inside and has a beautiful , crisp texture on the outside.
Of course, there are a variety of focaccia bread all over Italy and the world. Arguably, the most common one is focaccia al rosmarino or focaccia with rosemary. Rosemary focaccia is more moist and fluffy than any regular flatbread. It’s usually served as an appetizer or a table bread, but I’m eating it as a midnight snack.
So, this recipe of focaccia is closer to the focaccia al rosmarino than other types of focaccia such as focaccia alla genovese (Focaccia from Genoa) which is a thinner, more crispier type of focaccia.
Now, this particular recipe has been adapted from Joshua Weissman. I love his stuff; he taught me quite a lot about baking, to be honest.
And, my recipe calls for five essential ingredients as I said. They are all-purpose flour, instant yeast, salt, olive oil, and water. The toppings are 100% up to you, but I’m adding red onions, sliced black and green olives, garlic, dried rosemary, thyme, and basil. I also like to brush it with some fresh garlic butter right before serving. There’s honestly nothing better than garlic and butter together, fight me.
As for the instant yeast in the dough, you can always substitute it with active dry yeast and fresh yeast. Except, you’ll have to bloom the yeast in the water first. For the yeast to activate, no matter what kind, you’ll need to use lukewarm water. For those like me, without a thermometer, dip your index finger in the water, and if it feels nothing, it’s warm enough.
I also made a pathetic attempt at making a focaccia garden; the mental satisfaction was far better than the result. I blame my poor performance on the red onions, which looked more like white onions. Regardless, it’s therapeutic, and I highly recommend making focaccia gardens. It doesn’t matter what it looks like in the end; it’s your damn garden.


For the confused ones, the focaccia garden (fig. 2&3) has been a trend on social media for the last couple of months, where focaccia bakers dress their bread up in various designs with the toppings. Patterns with florals and foliage were among the more prominent ones, hence the name focaccia garden.
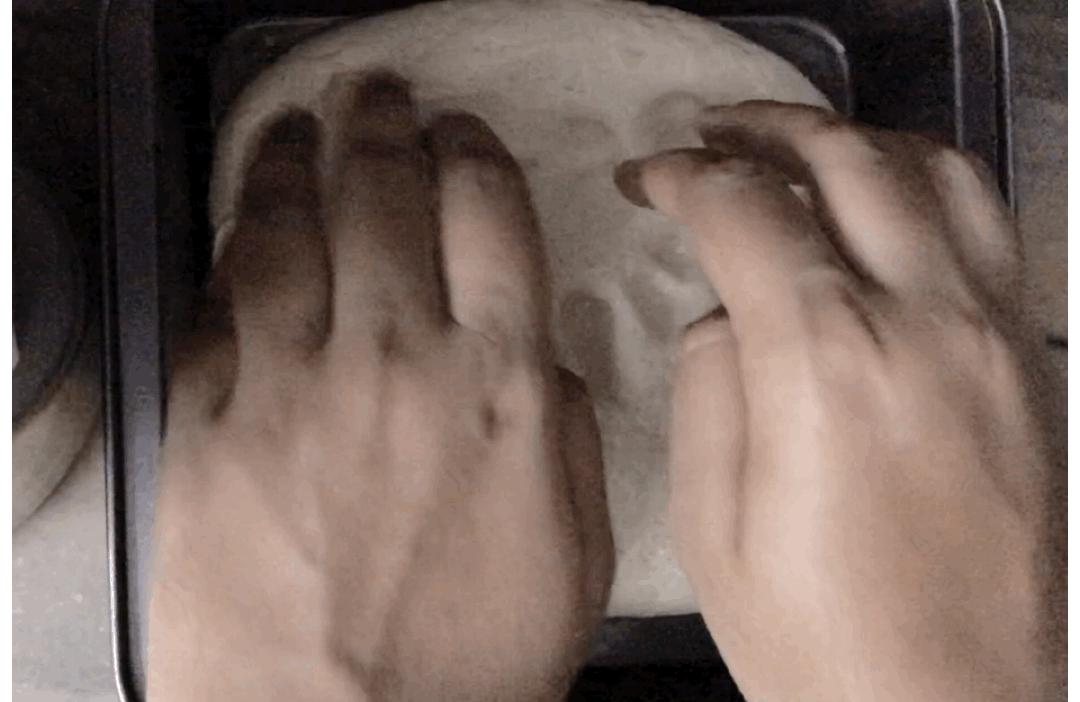
I also use a method known as “dimpling” to spread the focaccia dough in the pan. So, by using this method, what you will essentially be doing is spreading the dough without pulling or stretching it excessively. You will be dimpling or poking the dough with all of your fingers until it reaches the ends of the pan (fig. 4). Dimpling also creates tiny pockets in the focaccia dough, which will perfectly house your toppings.
Lastly, I feel like there is no need to say this, but do not deflate your dough. Do not press down on it after it has risen and proofed. All that time you put into it will go down the drain if you deflate the dough and will end up with dense, doughy focaccia.
Now, let’s move onto the equipment you’ll need to make this yum midnight snack.
Equipment
There’s no strict shape when it comes to focaccia, which is why you can use whatever oven-safe pan that you have. Round, square, rectangle, it all works. Maybe not a loaf tin, though. Loaf tins are narrower and deeper, and we’re making a flatbread, not a loaf of bread. So, use an oven-safe pan that’s shallow and about 8-9 inches wide. Of course, if you have anything more bigger than that, you will have to increase the quantities of the recipe.
The next thing is an electric hand mixer with a hook attachment. A hook attachment on an electric mixer is perfect when it comes to working with dough. It’ll knead the dough and do 90% of the work for you. You can replicate the actions of an electric mixer with your hands, but you shouldn’t have to. The very reason for this recipe being no-knead is the usage of an electric mixer. Still, it’s your choice. To electric hand mixer or not to electric hand mixer? That is the question.
So, I’m going to list every piece of equipment you’ll need for this recipe:
A medium-sized mixing bowl
A large mixing bowl
An 8-9 inch wide, shallow, oven-safe pan of any shape
Electric hand mixer with a hook attachment (optional)
Rubber spatula
Plastic wrap
A cotton kitchen towel
A knife
Thin metal spatula
The Recipe For a Late Night Snack Focaccia
Time: 2 hours
Yields: One 8x8 inch square focaccia
INGREDIENTS (Click For Grams To Cups Converter)
Focaccia:
250 grams (2 cups) all-purpose flour
¾ teaspoon fine salt
½ tablespoon instant yeast
150 grams (½ cup + 3 tablespoons) lukewarm water (between 35°C to 40°C)
1 tablespoon olive oil (plus more for the bowl, pan, and toppings)
Toppings:
1 medium-sized red onion, chopped into thin slices
6-7 slices of black olives
6-7 slices of green olives
3-4 cloves of garlic, finely chopped
½ teaspoon dried rosemary
½ teaspoon dried thyme
½ teaspoon dried basil
2 teaspoons crushed sea salt
Garlic Butter:
7-8 cloves of garlic
4 tablespoons butter
METHOD
Focaccia:
In a mixing bowl, add the flour, salt, and yeast. Whisk the dry ingredients together.
Using an electric mixer with the hook attachment, form the dough by gradually adding water.
If you see stray dough crumbs, use a rubber spatula to push them into the dough, and continue kneading for 3-5 more minutes.
Once you start seeing a cohesive dough form, add the tablespoon of olive oil.
Keep kneading the dough until you see a single dough ball without anything stuck to the bowl. You’re looking for a clean bowl and dough sticking away from it. This will take about 4-5 minutes if you're using an electric mixer, 15 minutes if you are doing this by hand.
Turn the dough onto a surface and form it into a ball.
Add 4 teaspoons of olive oil to a clean, large mixing bowl and put the ball of dough in it. Toss it in the bowl, so the sides of the bowl and the dough are coated in oil.
Cover the bowl securely with plastic wrap and let it rise for 1 hour (or until it has doubled in size) in a warm spot of your kitchen.
Add 2 tablespoons of olive oil to an 8x8 inch square pan and coat the pan evenly with it. Sprinkle some crushed sea salt on the bottom of the greased pan.
Put the dough into the pan and push it towards the edges evenly by using the ‘dimpling’ method. Dimpling is when you poke the dough with your fingers to spread it. (fig. 4)
Preheat your oven to 230°C.
Cover with a damp kitchen towel and let it rest for 30 minutes, or until the dough is puffy and has risen a little.
To the proofed dough, add your toppings and drizzle with some more olive oil and sea salt.
Bake in the preheated oven for 20-25 minutes.
Carefully take the focaccia out of the pan using a thin spatula.
Let it cool down for 10-15 minutes before serving.
Garlic Butter:
Melt the butter in a frying pan on medium to low heat. Take it off the heat once it’s melted completely.
Finely chop the garlic and add it to the melted butter.
Place the pan back on medium to low heat and roast the garlic for 30 seconds to a minute.
Brush the butter on the focaccia only when you’re about to eat it, not beforehand.

Notes
Living in warm climates like in India, it can be very easy to over-proof your dough. So, go by the physical indicators rather than the given time as the weather and environmental temperature will vary from place to place. So, during the initial bulk rise, instead of relying on the clock, check the dough size. If it has doubled in size, you’re good to go. And during proofing, if the dough looks puffy and has risen about an inch, it is ready to be baked.
Also, focaccia, like any bread, can stay in the refrigerator for up to a week. Just make sure it’s in an airtight container. I promise you; it will taste just as delicious even after being warmed in a microwave. It can stay at room temperature in an airtight container for up to 12 hours.
Enjoy your late-night snack, and let me know your thoughts in the comments below! If you try any of my recipes, please share your experiences with me on Instagram or Facebook!