
Bread can be a very gratifying baking project, but it can also be quite a tasking project. And on days when you want to make a rustic loaf of bread without putting in a lot of effort, finding the right recipe can be quite hard.
Well, stop searching because I have the best recipe for the most effortless artisanal bread you make at home.
What’s artisanal bread? Well, no one really knows what it means, but it is usually used to describe fresh loaves of bread made with simple ingredients and take quite a while to make. Some types of bread that can be considered artisanal are sourdough, baguette, ciabatta, and rye.
One of the defining factors of an artisanal bread is the yeast fermentation time: almost all recipes for any type of artisanal bread call for a remarkably long fermentation or rising period and very traditional kneading techniques. This recipe gives you the same result but without all the extra effort.
This recipe is extremely easy, requires no special equipment and minimal elbow grease. Although the dough needs a while to rise, that entire time is inactive for you so you can feel free to do whatever you want meanwhile!
This loaf of bread is a beast; it more than doubles in size while baking. And, for the amount of effort you’ll put into it, you will get an impressive result. With this recipe, you’ll get a beautiful rustic, artisanal bread that nearly mimics sourdough bread. It’s wonderfully aerated on the inside, and it tastes brilliant.

Without anymore stalling, let’s dive right into it.
What goes into this loaf of bread?

This gorgeous loaf of bread calls for only four ingredients: all-purpose flour or white flour, instant yeast, salt, and warm water.
The ideal option for flour would be bread flour as it is packed with gluten that the yeast will eat up, and your bread dough will be soft and elastic. But the next best alternative which is readily available in India is all-purpose flour, and it has a fair amount of gluten, which will feed the yeast adequately. You can use whole wheat flour, but 100% whole wheat flour in bread won’t do you much good even though it has the highest gluten content among the flours mentioned above. It is so because whole wheat flour is coarser than bread flour and all-purpose flour, which can stunt the gluten development in the dough.
Next up is yeast. I recommend using instant yeast because it’s no-nonsense. You just add it directly to the flour, and it’ll do the job. In case you have only active dry yeast aka regular yeast, you’ll need to dissolve it in water before adding it to the flour. You don’t need to let it bloom, just dissolving the yeast will do. If you don’t have yeast and are unable to find it in stores, you can make this Irish Soda Bread, which calls for baking soda!
I add a pinch of salt for taste. You can add sugar to speed up the fermentation process a little, but living in warm countries as India, you don't really need to.
The water in this recipe is just regular drinking water. But unlike a standard bread recipe, the water used is warm instead of lukewarm. So we want it to be a tiny bit hotter than blood temperature, blood temperature is lukewarm. But don’t use hot water, it can kill the yeast.

Once you’ve got all the ingredients, it’s pretty easy from there onwards. You don’t need to knead the dough at all, it’s a no-knead recipe. You incorporate all the ingredients together and then let it rise for somewhere between an hour to three hours in the same bowl that you mixed it in. You’ll have a dough on the sticky side, that’s how it’s going to be, but don’t worry, you won’t get it everywhere.
You’ll know the dough has risen when it has doubled in size and has a lot of bubbles on top and jiggles when you move the bowl. This step usually takes me an hour and a half, but it entirely depends on how warm your environment is, which is why I always recommend checking the physical signs rather than the time.
Then, once the dough is ready, we shape it. Here’s where you’ll need to get your hands in. This bread is pretty much sourdough bread minus the long process and the starter. And to mimic sourdough bread, we pre-shape the dough before finally shaping the dough.

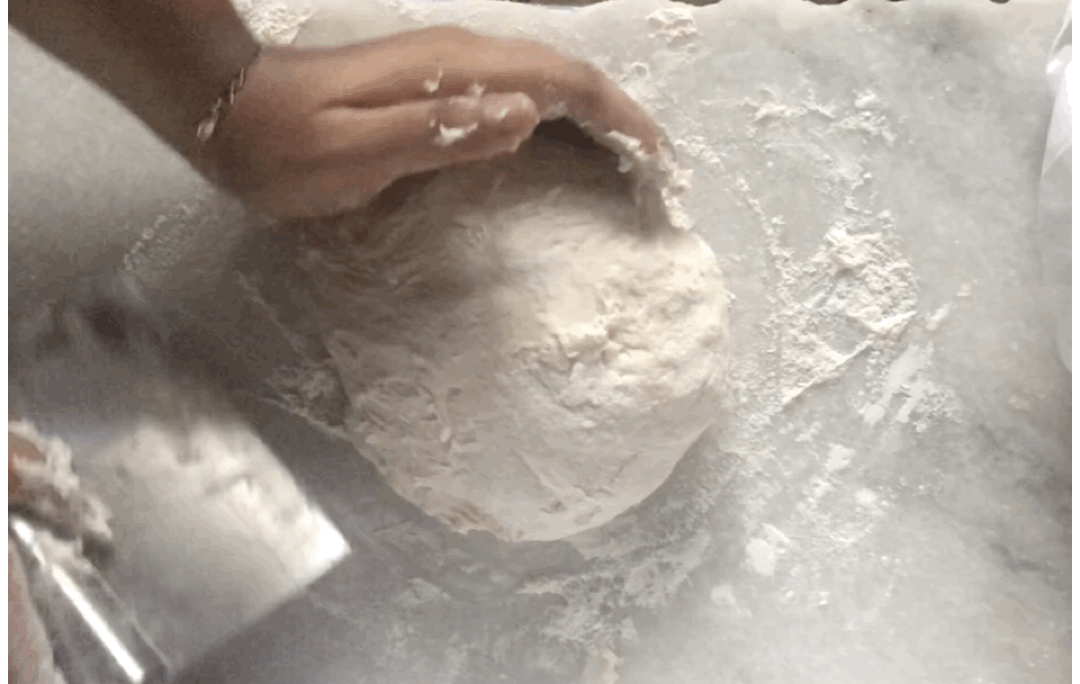
You’re going to transfer the risen dough to a surface that is adequately floured and flour it again from the top. To pre-shape (fig. 4), you’ll fold it in an envelope style, folding it in from all four sides, and pinch them together in the center.
Then, to give the dough the final shape (fig. 5), I’ve adopted a technique from sourdough bread baking. Holding a bench scraper or a metal spatula in your dominant hand, you will push the dough from the side closest to you to the opposite side with your other hand, restricting it from shifting too much. This essentially gives your bread strength and structure; this process where you form the boule or dough ball. Once you feel that the bread boule is tight and is holding its shape, you’ll place it on a baking tray, and it goes into the oven.
Oh, and before baking, you must score the bread. Scoring bread gives all of the beautiful steam that’s cooking it on the inside an exit. No one wants random cracks on their bread, now, do they?

That’s pretty much it, now let us see what equipment you need to make this easy, rustic homemade bread.
Equipment
As mentioned above, you only need a single bowl to make this loaf of bread. Try and get the biggest bowl that you have since the dough will double in size. Apart from that, you’ll need a wire whisk and a spatula to form the dough. You will also need a thin metal spatula or a bench scraper during final shaping.
For the baking part, you’ll need a baking tray and some parchment paper. Bread needs steam to cook, and for that reason, I use another smaller baking tray filled with water and place it under the rack in my oven to produce steam. Try not to skip this step, and if your oven is too small or if you don’t have an extra baking tray, spray some water inside the oven right before closing the door to begin baking.
With that, here’s everything you need to make the easiest rustic, artisanal bread:
A large mixing bowl
A wire whisk
A rubber spatula
A metal spatula or a bench scraper
Plastic wrap or a cotton kitchen towel
Two baking trays
Parchment paper

The Recipe For The Most Effortless Artisan Bread
Time: 50 minutes plus rising
Yields: One small loaf
INGREDIENTS
225 grams (1¾ cup) all-purpose flour, plus more for dusting
1 teaspoon instant yeast
1 teaspoon salt
187 grams (¾ cup) warm water
METHOD
Forming the dough:
In a large mixing bowl, add in the flour, yeast on one side and salt on the other. Give it a good mix using a wire whisk.
Trail in the water slowly and form the dough using a rubber spatula. Add in the water until you have a sticky dough, it shouldn’t be like a batter, but it should be on the sticky side.
Rising:
Cover the bowl tightly with plastic wrap and then lay a cotton kitchen towel on top (only a damp cotton kitchen towel will also do if you don't have plastic wrap). Let it rise in a warm spot for about 1 ½ hour to 2 hours. The dough should have doubled in size during this time.
Preheat the oven to 230°C and place an empty baking tray under the rack.
Once the dough has doubled, transfer the dough to a well-floured surface. Sprinkle some more flour on top of the dough.
Pre-shape (fig. 4):
Slightly stretch the dough into a rectangle and fold it in envelope style (fold from all four sides into the center).
Final-shape (fig. 5):
Flip it over and using a bench scraper, shape it into a tight ball.
Place the dough with the smooth side up on a sheet of parchment paper and transfer it to a baking tray. Score a line on the dough.
Baking:
Pour some water into the empty baking tray that has been preheating.
Place the baking tray with the dough on top of the rack and bake for 30 minutes at 230°C. Remove the water tray and bake for 12 more minutes at 230°C.
Rest the bread on a cooling rack for 30 minutes or more before cutting in.

Notes
If you’re not in a time crunch and you’d like a loaf of bread with a much more developed flavor, it’s best to let it rise overnight in the refrigerator. Cover the bowl as you would while following this recipe and then place it in the fridge for anywhere between 12-24 hours. Then, shape and bake!
That was it, that was the most effortless artisanal bread. I love this one, I hope you guys like it, and if you make it, please share it with me on Instagram or Facebook!